

Dialog API
Dialogs are a feature added to Minecraft in the 1.21.6 update. Paper released developer API for creating custom dialogs in 1.21.7. This section is meant as an introduction to this API and what you can and cannot do with dialogs.
What is a dialog
Section titled “What is a dialog”Dialogs are a way for servers to send custom in-game menus to clients. They allow for displaying various information or provide an easy way to gather user input.
Dialogs can be shown to players during the configuration phase or normal gameplay, which makes them a very versatile tool. A simple dialog might look like this:
The dialog shown here is a confirmation-type dialog, which just means it always contains two buttons, one meant for confirmation and one meant for refusal.
Showing dialogs
Section titled “Showing dialogs”Dialogs can be shown in-game using the /dialog show <players> <dialog> command. Alternatively, you can show them
using the API by using Audience#showDialog(DialogLike).
You can get build-in dialogs statically from the Dialog interface.
New dialogs can be created dynamically using Dialog#create
or, if registered during the bootstrap phase, retrieved from the dialog registry with RegistryAccess.registryAccess().getRegistry(RegistryKey.DIALOG).get(Key).
Build-in dialogs
Section titled “Build-in dialogs”There are three build-in dialogs:
Currently, only the server links can be modified from the API.
Adding server links
Section titled “Adding server links”You can add server links by retrieving the ServerLinks instance from
Bukkit.getServer().getServerLinks() and using the various mutation methods.
The player can open the server links menu at any time by opening the game menu (pressing esc) and clicking on
the Server Links... button. This button only appears if server links are present.
Creating dialogs dynamically
Section titled “Creating dialogs dynamically”You can build a Dialog object using the Dialog#create
method. The consumer parameter allows you to build the dialog. A dialog always requires a base and a type, which
can be declared in the builder. In order to create a new dialog, you first call .empty() on the consumer parameter.
You can alternatively modify an existing registry-registered dialog instead
of starting from scratch.
For reference, a very simple (notice-type) dialog can be constructed and shown to a player with the following code:
Dialog dialog = Dialog.create(builder -> builder.empty() .base(DialogBase.builder(Component.text("Title")).build()) .type(DialogType.notice()));player.showDialog(dialog);In-game preview
Dialog base
Section titled “Dialog base”You can create a dialog base using its builder, which can be created
using DialogBase.builder(Component title).
A dialog base can declare the following values:
| Builder Method | Description |
|---|---|
afterAction(DialogAfterAction) | The action to take after the dialog is closed |
canCloseWithEscape(boolean) | Whether the dialog can be closed with the esc key |
externalTitle(Component) | The title to display on buttons which open this dialog |
body(List<? extends DialogBody>) | The body of the dialog. |
inputs(List<? extends DialogInput>) | The inputs of the dialog. |
Dialog body
Section titled “Dialog body”A dialog can contain an arbitrary number of body components. A body entry can be created using DialogBody.plainMessage(Component)
for displaying text or DialogBody.item(ItemStack)
for displaying items.
Dialog input
Section titled “Dialog input”There are four ways to gather input:
-
A simple tick box representing a true or false state
-
A multiple-choice button
-
A simple string input field
-
A slider for number input
Dialog type
Section titled “Dialog type”The DialogTypes interface defines a few static
methods for the various dialog types. The following types exist:
| Type | Method | Description |
|---|---|---|
| notice | notice() or notice(ActionButton button) | A simple dialog with just one button |
| confirmation | confirmation(ActionButton yesButton, ActionButton noButton) | A dialog with a yes and no button |
| dialog list | dialogList(RegistrySet dialogs) | A dialog for opening the specified, registered dialogs |
| multiple actions | multiAction(List<ActionButton> actions) | A dialog for displaying multiple buttons |
| server links | serverLinks(ActionButton exitAction, int columns, int buttonWidth) | A server links dialog |
The type primarily influences the bottom part of the dialog.
Registering dialogs in the registry
Section titled “Registering dialogs in the registry”If you want dialogs to be registered in the dialogs registry, you have register them inside a registry modification lifecycle event in your plugin’s bootstrapper. Some general information on that can be read here.
The general registration looks fairly similar to dynamically created dialogs:
@Overridepublic void bootstrap(BootstrapContext ctx) { ctx.getLifecycleManager().registerEventHandler(RegistryEvents.DIALOG.compose() .newHandler(event -> event.registry().registerWith( TypedKey.create(RegistryKey.DIALOG, Key.key("papermc:custom_dialog")), builder -> builder.empty() // ... build your dialog here )));}Example: A blocking confirmation dialog
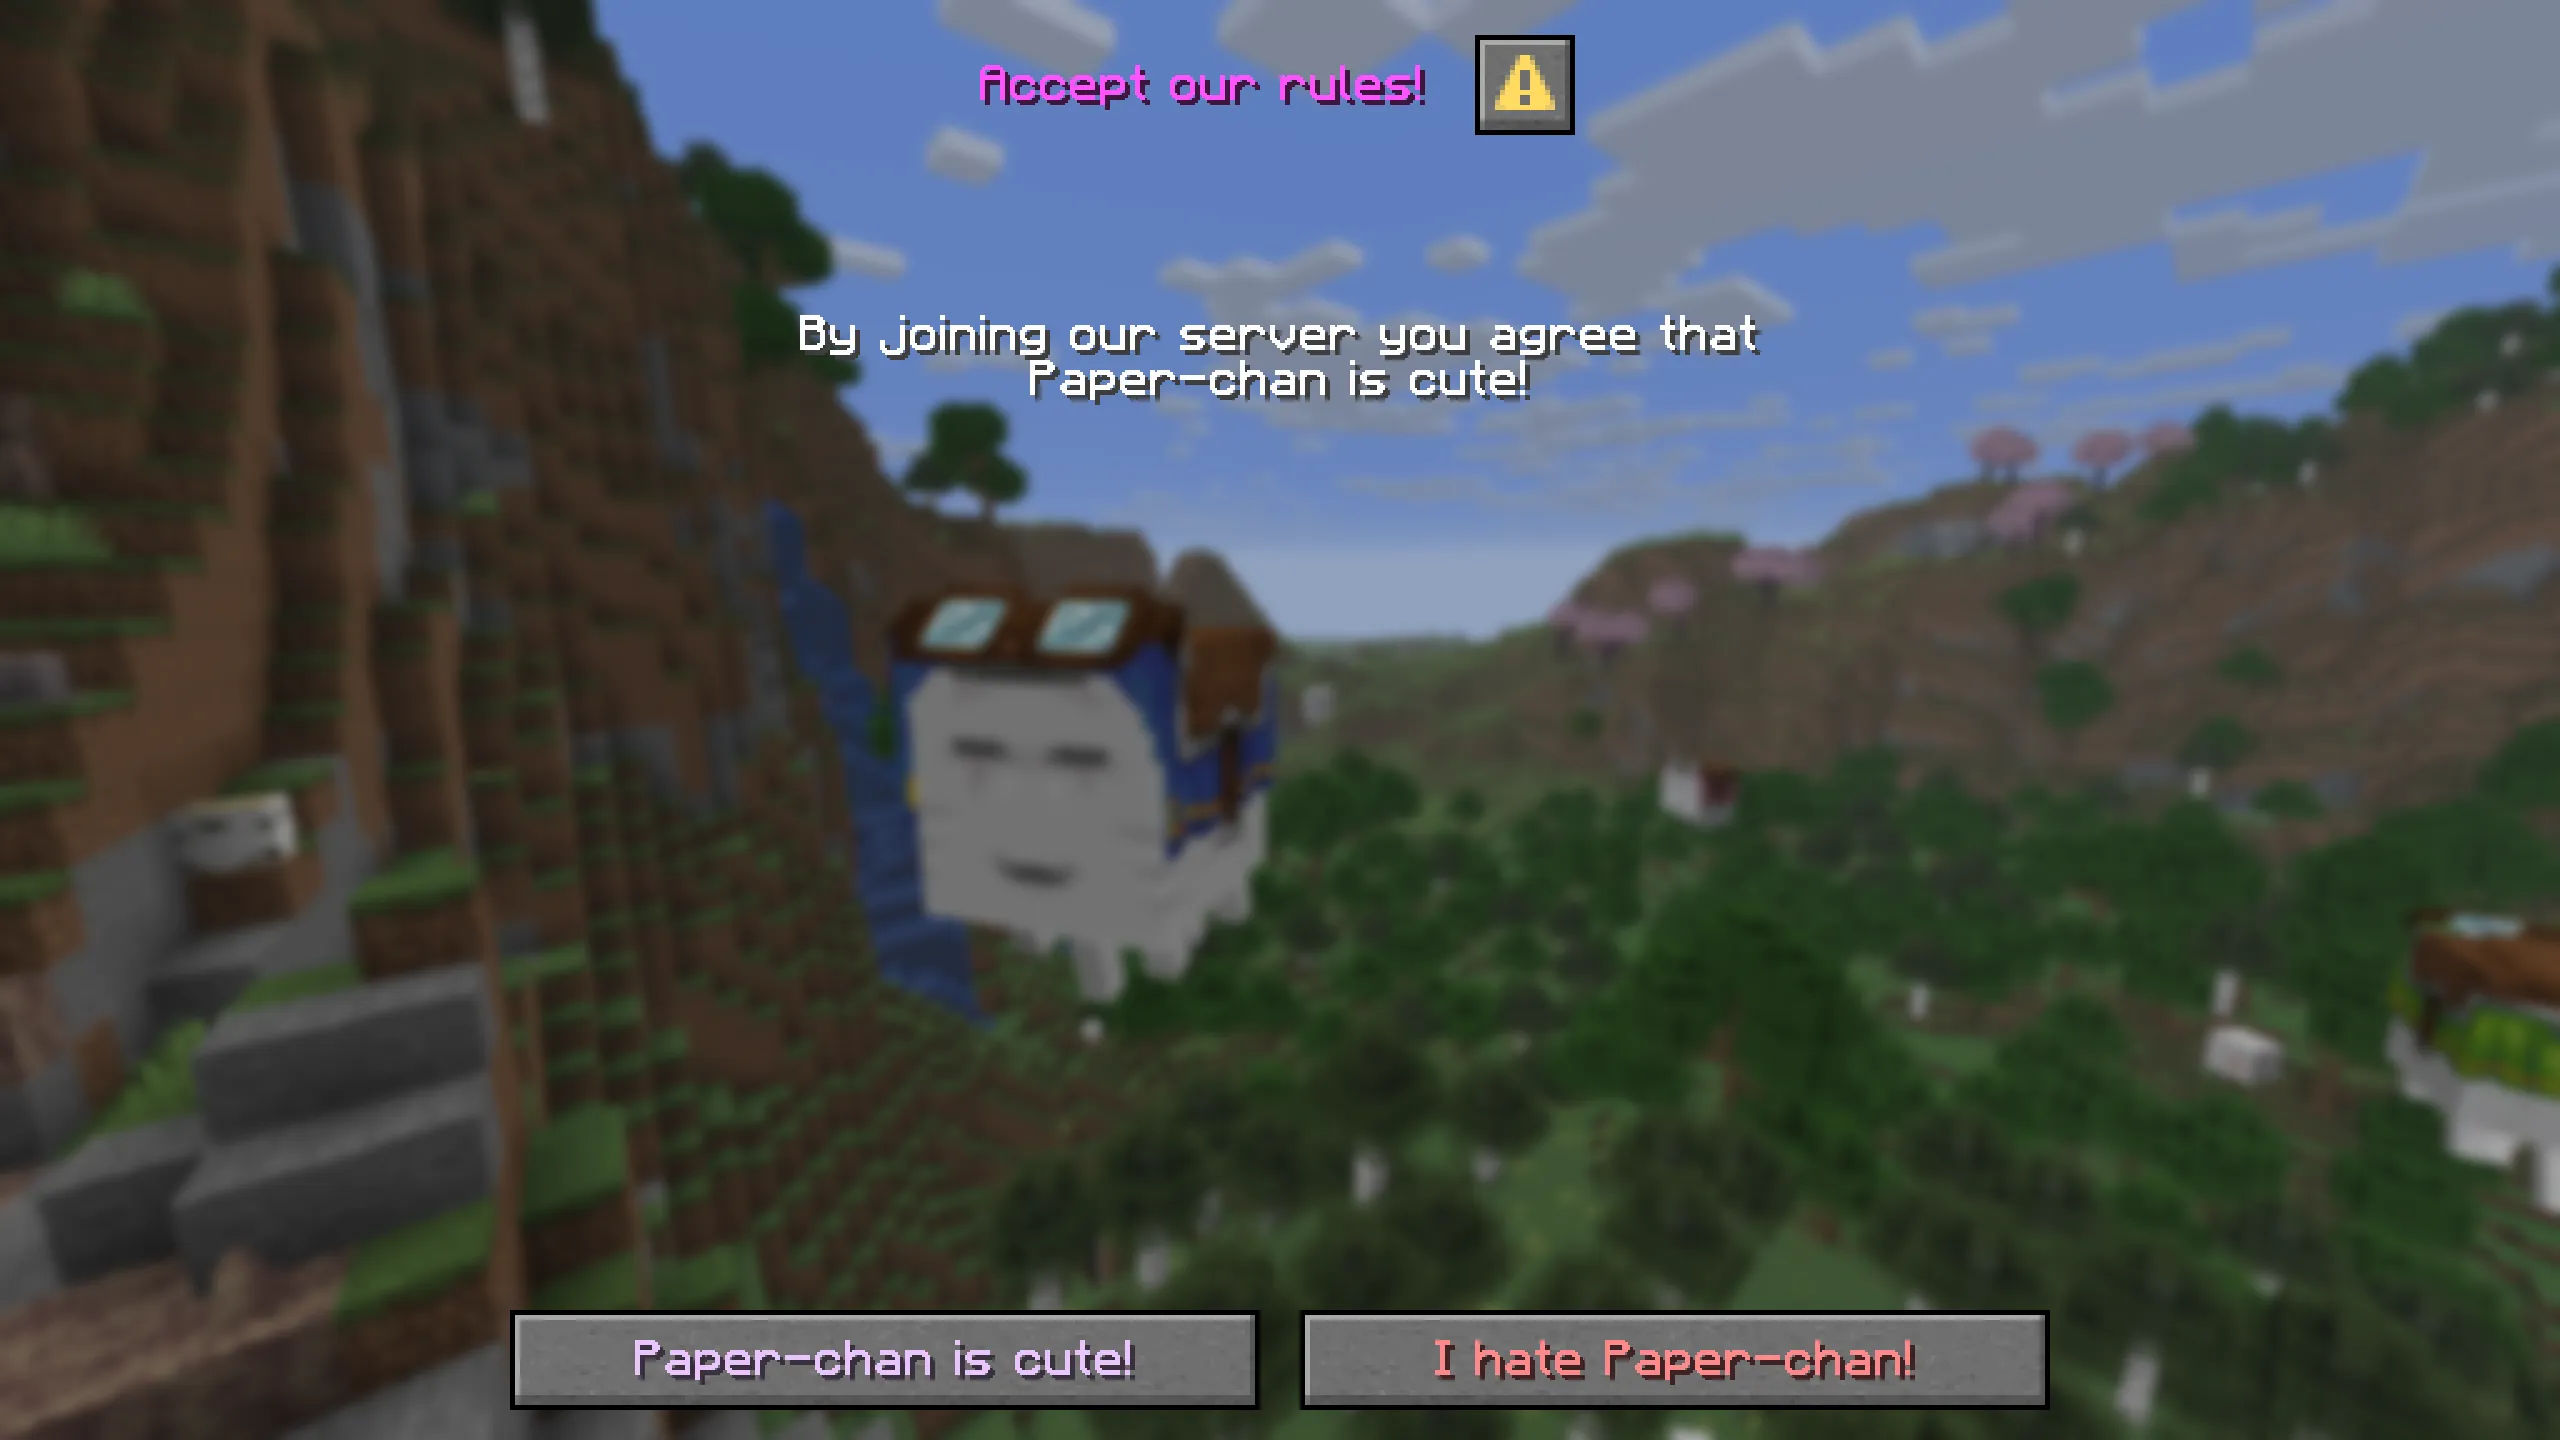
Section titled “Example: A blocking confirmation dialog”If you want your players to read some information, agree to something, or give general input before they join your server, you can send them a dialog during the configuration phase. For this example, we will be creating the dialog shown at the start.
The dialog
Section titled “The dialog”The dialog is a simple confirmation-type dialog with a single plain message body components. We will register it in
the bootstrapper so that we can easily retrieve it from the AsyncPlayerConfigureEvent, where the dialog will
be sent from.
ctx.getLifecycleManager().registerEventHandler(RegistryEvents.DIALOG.compose(), e -> e.registry().registerWith( DialogKeys.create(Key.key("papermc:praise_paperchan")), builder -> builder.empty() .base(DialogBase.builder(Component.text("Accept our rules!", NamedTextColor.LIGHT_PURPLE)) .canCloseWithEscape(false) .body(List.of( DialogBody.plainMessage(Component.text("By joining our server you agree that Paper-chan is cute!")) )) .build() ) .type(DialogType.confirmation( ActionButton.builder(Component.text("Paper-chan is cute!", TextColor.color(0xEDC7FF))) .tooltip(Component.text("Click to agree!")) .action(DialogAction.customClick(Key.key("papermc:paperchan/agree"), null)) .build(), ActionButton.builder(Component.text("I hate Paper-chan!", TextColor.color(0xFF8B8E))) .tooltip(Component.text("Click this if you are a bad person!")) .action(DialogAction.customClick(Key.key("papermc:paperchan/disagree"), null)) .build() )) ));Notice the .action methods on the confirmation ActionButtons. These hold a key and an optional, custom NBT payload
that will be sent from the client to the server when the player clicks one of the buttons. We use that to identify
the click event.
This example uses two separate keys for both keys, but you can also use only one and set a custom NBT payload.
Requiring the player to agree before allowing them to join
Section titled “Requiring the player to agree before allowing them to join”In order to block the player from joining the server, we send them the dialog and await a response. We do
this by constructing a CompletableFuture, putting it into a map, and waiting until the future gets
completed, will only happen as soon the player pressed one of the two confirmation buttons of the dialog.
The code for that would look something like this:
@NullMarkedpublic class ServerJoinListener implements Listener {
    /**     * A map for holding all currently connecting players.     */    private final Map<PlayerCommonConnection, CompletableFuture<Boolean>> awaitingResponse = new HashMap<>();
    @EventHandler    void onPlayerConfigure(AsyncPlayerConnectionConfigureEvent event) {        Dialog dialog = RegistryAccess.registryAccess().getRegistry(RegistryKey.DIALOG).get(Key.key("papermc:praise_paperchan"));        if (dialog == null) {            // The dialog failed to load :(            return;        }
        // Construct a new completable future without a task        CompletableFuture<Boolean> response = new CompletableFuture<>();
        // Put it into our map        awaitingResponse.put(event.getConnection(), response);
        // Show the connecting player the dialog        event.getConnection().getAudience().showDialog(dialog);
        // Wait until the future is complete. This set is necessary to keep the player in the configuration phase        if (!response.join()) {            // If the response is false, they declined. Therefore, we kick them from the server            event.getConnection().disconnect(Component.text("You hate Paper-chan :(", NamedTextColor.RED));        }
        // We clean the map to avoid unnecessary entry buildup        awaitingResponse.remove(event.getConnection());    }
    /**     * An event for handling dialog button click events.     */    @EventHandler    void onHandleDialog(PlayerCustomClickEvent event) {        Key key = event.getIdentifier();
        if (key.equals(Key.key("papermc:paperchan/disagree"))) {            // If the identifier is the same as the disagree one, set the connection result to false            setConnectionJoinResult(event.getCommonConnection(), false);        } else if (key.equals(Key.key("papermc:paperchan/agree"))) {            // If it is the same as the agree one, set the result to true            setConnectionJoinResult(event.getCommonConnection(), true);        }    }
    /**     * Simple utility method for setting a connection's dialog response result.     */    private void setConnectionJoinResult(PlayerCommonConnection connection, boolean value) {        CompletableFuture<Boolean> future = awaitingResponse.get(connection);        if (future != null) {            future.complete(value);        }    }}
And that’s all there is to it. You can use this code to block players from joining your server before they should be allowed to.
In-game preview
Example: Retrieving and parsing user input
Section titled “Example: Retrieving and parsing user input”The dialog for this example will be fairly simple: It again confirmation-type dialog which contains two number range inputs. The top input will be for setting the level, the bottom input for setting the experience percentage towards the next level. When the player clicks on the confirmation button, they should have their levels and exp set to the configured values.
Dialog.create(builder -> builder.empty() .base(DialogBase.builder(Component.text("Configure your new experience value")) .inputs(List.of( DialogInput.numberRange("level", Component.text("Level", NamedTextColor.GREEN), 0f, 100f) .step(1f) .initial(0f) .width(300) .build(), DialogInput.numberRange("experience", Component.text("Experience", NamedTextColor.GREEN), 0f, 100f) .step(1f) .initial(0f) .labelFormat("%s: %s percent to the next level") .width(300) .build() )) .build() ) .type(DialogType.confirmation( ActionButton.create( Component.text("Confirm", TextColor.color(0xAEFFC1)), Component.text("Click to confirm your input."), 100, DialogAction.customClick(Key.key("papermc:user_input/confirm"), null) ), ActionButton.create( Component.text("Discard", TextColor.color(0xFFA0B1)), Component.text("Click to discard your input."), 100, null // If we set the action to null, it doesn't do anything and closes the dialog ) )));Reading the input
Section titled “Reading the input”To retrieve the values the user put into the dialog, we once again have to listen to a PlayerCustomClickEvent.
We first check the identifier of the action. After that, we can retrieve the input values from the
DialogResponseView retrievable from
PlayerCustomClickEvent#getDialogResponseView().
This view allows us to retrieve the value of an input field with the field’s key. Those are declared as the first
parameter of the DialogInput.numberRange method.
The last issue is getting a player object from this event. We cannot just call event.getPlayer(). Instead, we have
to cast the connection retrievable from PlayerCustomClickEvent#getCommonConnection().
to a PlayerGameConnection, from which we can get the player.
The full event handler code looks like this:
@EventHandlervoid handleLevelsDialog(PlayerCustomClickEvent event) {    if (!event.getIdentifier().equals(Key.key("papermc:user_input/confirm"))) {        return;    }
    DialogResponseView view = event.getDialogResponseView();    if (view == null) {        return;    }
    int levels = view.getFloat("level").intValue();    float exp = view.getFloat("experience").floatValue();
    if (event.getCommonConnection() instanceof PlayerGameConnection conn) {        Player player = conn.getPlayer();        player.sendRichMessage("You selected <color:#ccfffd><level> levels</color> and <color:#ccfffd><exp>% exp</color> to the next level!",            Placeholder.component("level", Component.text(levels)),            Placeholder.component("exp", Component.text(exp))        );        player.setLevel(levels);        player.setExp(exp / 100);    }}